This article provides a great walk through on how to step-by-step change your Honda Element Thermostat. Please do yourself the favor and replace this with an OEM genuine Honda thermostat, it’s not too expensive on Amazon! I have a link below to the OEM product. Get it done right the first time! Please follow this guide and if you have any questions please be sure to join the facebook group to ask!
Step-By-Step Directions
-
Remove Plastic Splash Guard
Two 10mm bolts and a bunch of black plastic fasteners hold this splash shield up into place. You need to remove this first to gain access to the rest of the job. Special fastener tool and replacement fasteners will be linked below.
-
Drain Coolant
Open drain valve on bottom of radiator and drain the coolant into an approved container and dispose of properly
-
Remove wire loom clip
On the thermostat housing is one of those annoying clips that hold the wire loom out of the way. You need to now remove that to gain access to the top bolt for the thermostat assembly.
-
Start with the Top Bolt
Make sure you can get the hardest bolt out first. Start at the top of the housing and remove the 10mm bolt at the top first.
-
Break the bottom bolts loose
After you get the top bolt out, just take your wrench and make sure you can free up the bottom two bolts, but leave them in for now, you will get more leverage for the next step
-
Remove the metal clip
Leaving those two bottom bolts in will allow you to get some leverage when removing the metal clip that holds the lower radiator hose on, use angled pliers to slide the clip up the hose and twist the hose to get it off the housing
-
Remove the lower two bolts
Once the lower radiator hose is off the thermostat housing finish taking the lower two 10mm bolts out and put those aside
-
Swap over secondary plastic thermostat piece
There is another elbow piece that you need to take off the old thermostat housing and install onto the new thermostat housing.
-
Install new thermostat
Install the new thermostat housing and reverse the directions to install the new thermostat. The torque specs of the three bolts are 8.66 ft lb Use Honda Type 2 Coolant to refill radiator, linked below
How to Replace Honda Element Thermostat
Learn how to replace your thermostat from this video!
Why you should use type 2 coolant
Learn if you should use type 2 coolant from this video!
Read More from the Blog
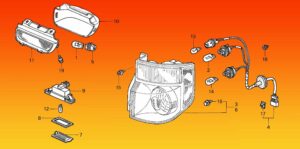
Honda Element Bulb Replacement Blowout Diagram Guide
Master Honda Element bulb replacements with our detailed blowout diagram guide! Perfect for DIYers, this visual resource covers headlight, tail light, and interior bulb locations...
Read MoreComplete Honda Element Light Bulb Sizes Guide
Struggling to find the right bulb sizes for your Honda Element? This complete guide lists all OEM light bulb replacements for headlights, tail lights, interior...
Read MoreEnhancing Your Honda Element Experience with the Dog E Window
Upgrade your Honda Element experience with the Dog E Window – a stylish and functional replacement for the third door window. Enhance airflow, ease of...
Read MoreRobDeezy Side Ladder: Step into Installation, Features and Review
Explore the RobDeezy Side Ladder – a game-changer for off-road enthusiasts. Uncover the intricacies of installation, dive into its features, and get an unfiltered review....
Read More