Master Honda Element bulb replacements with our detailed blowout diagram guide! Perfect for DIYers, this visual resource covers headlight, tail light, and interior bulb locations (2003-2011). Use alongside our Complete Light Bulb Sizes Guide for seamless repairs.
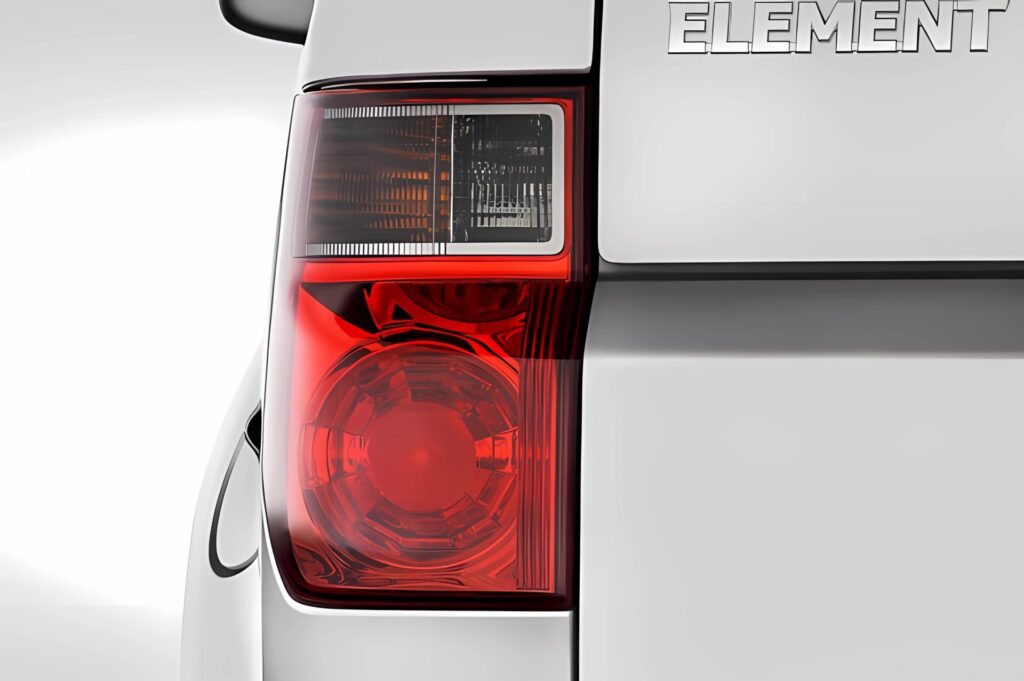
Table of Contents
- Honda Element Bulb Replacement Blowout Diagram Guides
- Cargo Area Overhead Dome Light
- Combination Lamp Bulb Lights
- Daytime Running Light Bulbs
- Dome Light Bulb
- Front Map Light Bulb
- Front Side Marker Light Bulb
- Front Turn Signal Light Bulb
- HeadLight Bulb Replacement
- High Mount 3rd Brake Light Bulb
- License Plate Light Bulb
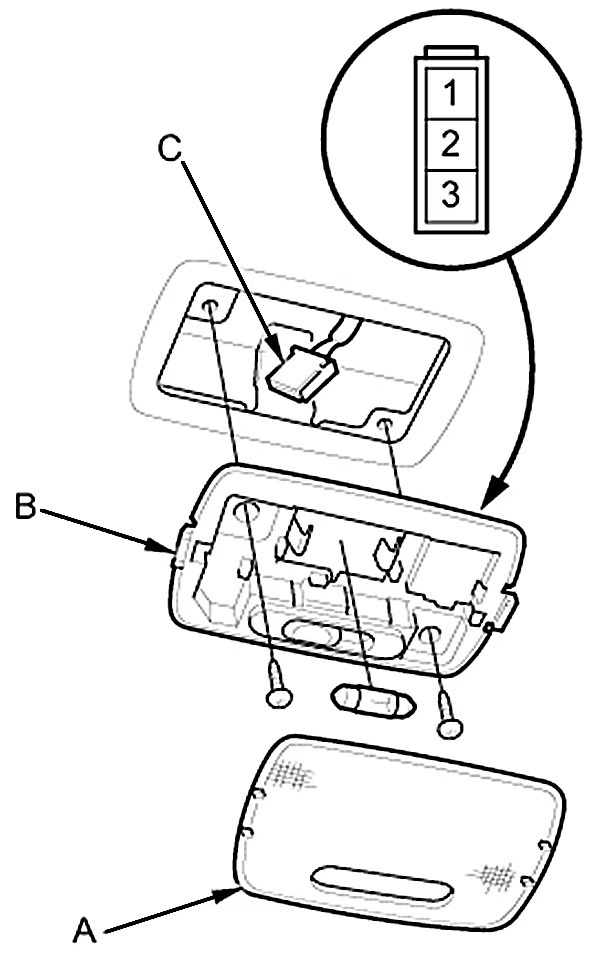
Cargo Area Overhead Dome Light
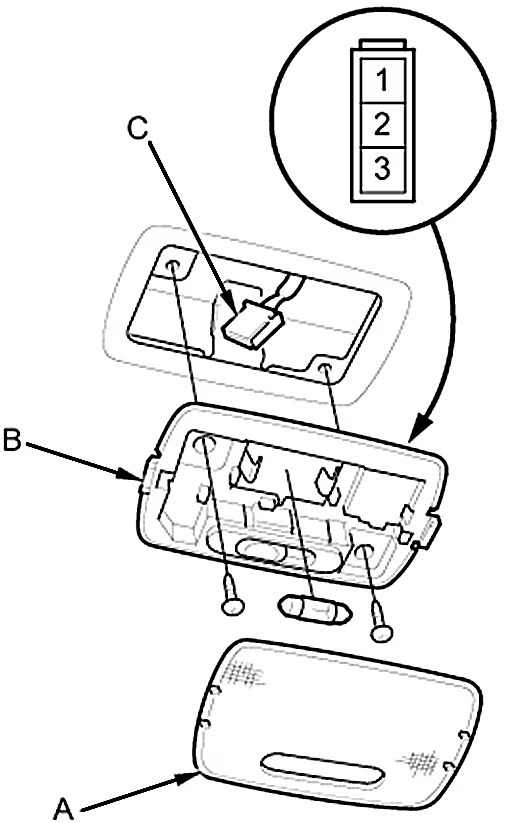
- Turn lamp switch OFF.
- Carefully pry lens off with a small screwdriver
- Remove bulb
- Reverse procedure to install
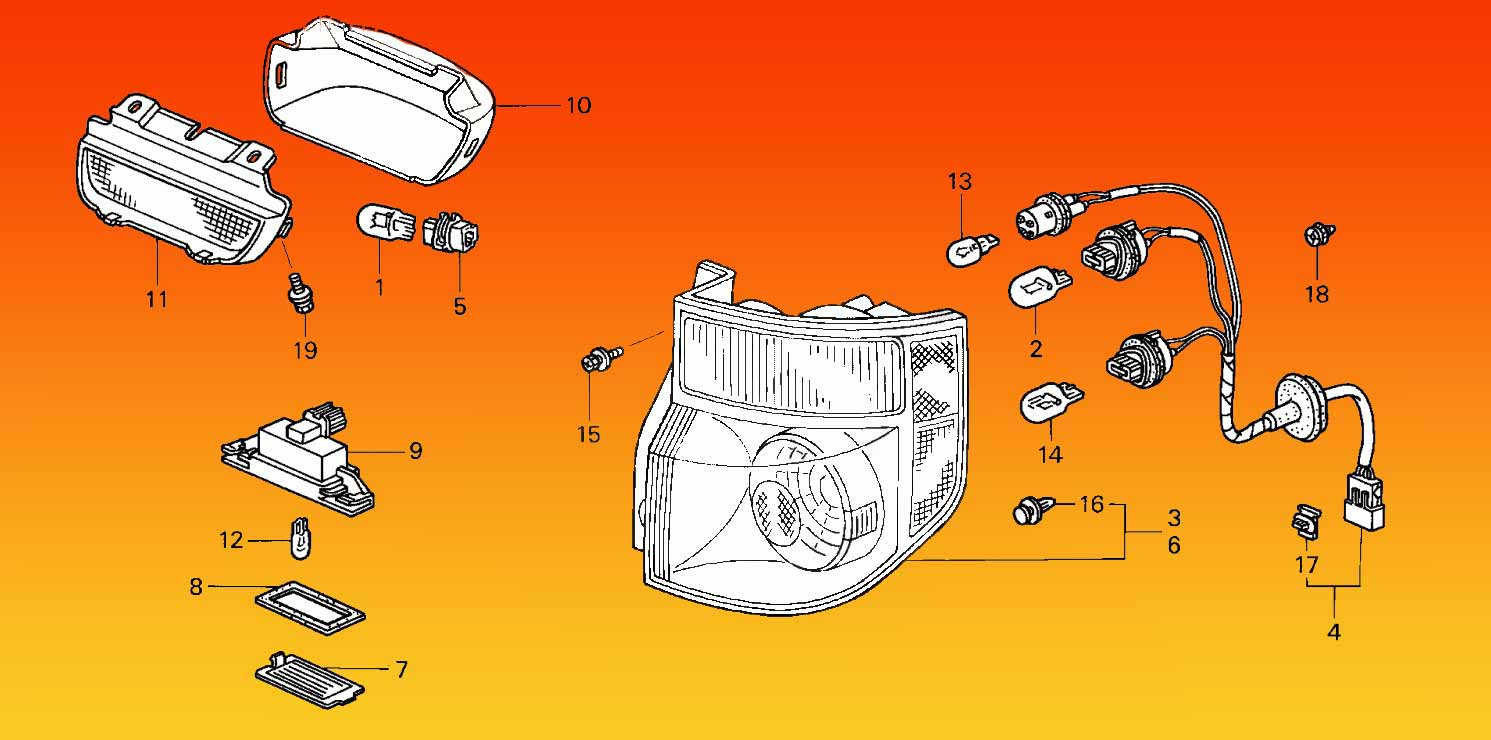
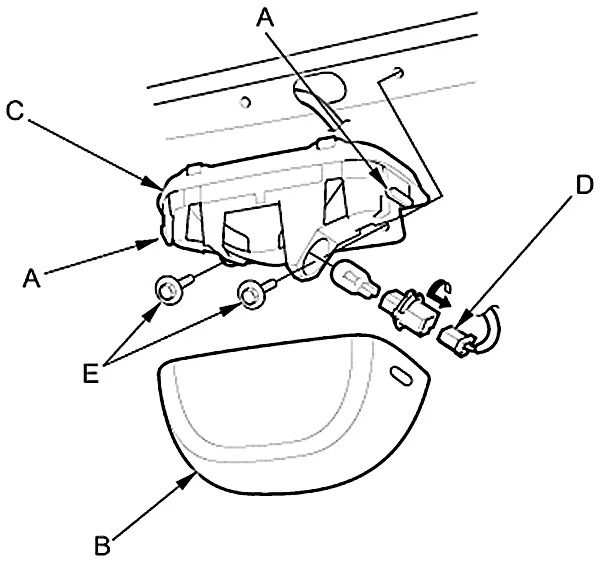
Combination Lamp Bulb Lights
- Remove two mounting bolts from tail lamp
- Pull tail lamp away from body to disengage clip
- Turn bulb socket counterclockwise to remove bulb socket
- If replacement of tail lamp harness is required, remove tail lamp harness grommet from body, and disconnect electrical connector from wire harness
- Reverse procedure to install
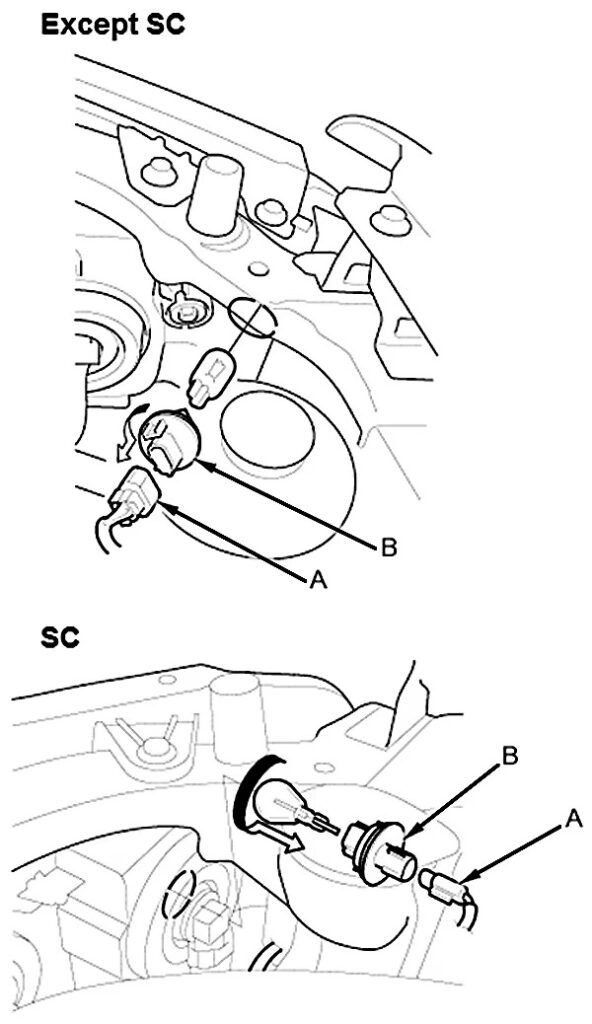
Daytime Running Light Bulbs

Do not touch glass area of bulb with your hands. Clean glass area with isopropyl alcohol, if required
- Disconnect electrical connector from headlamp bulb socket
- Turn bulb socket counterclockwise to remove it from headlamp housing
- Reverse procedure to install
Dome Light Bulb
- Turn lamp switch OFF
- Carefully pry lens off with a small screwdriver
- Remove bulb
- Reverse procedure to install
Front Map Light Bulb
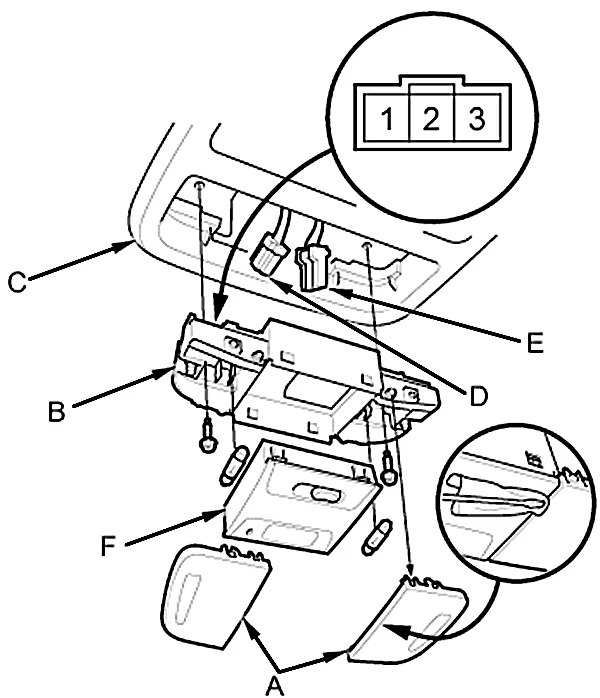
- Turn lamp switch OFF
- Carefully pry lens off with a small screwdriver
- Remove bulb
- Reverse procedure to install
Front Side Marker Light Bulb
- Disconnect electrical connector from lamp
- Turn bulb socket counterclockwise to remove it from headlamp housing
- Reverse procedure to install
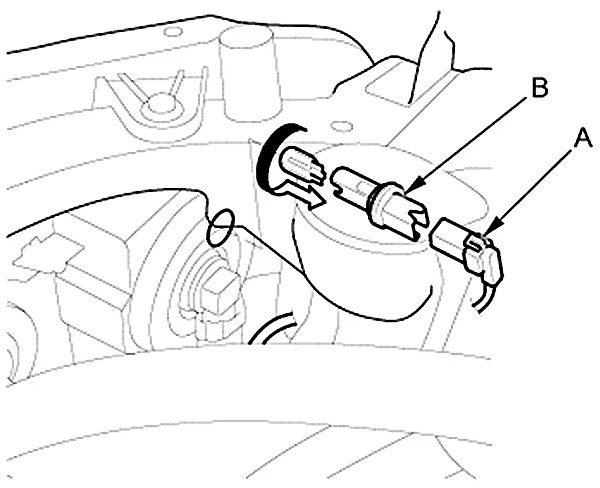
Front Turn Signal Light Bulb
- Disconnect electrical connector from lamp
- Turn bulb socket counterclockwise to remove it from headlamp housing
- Reverse procedure to install
HeadLight Bulb Replacement
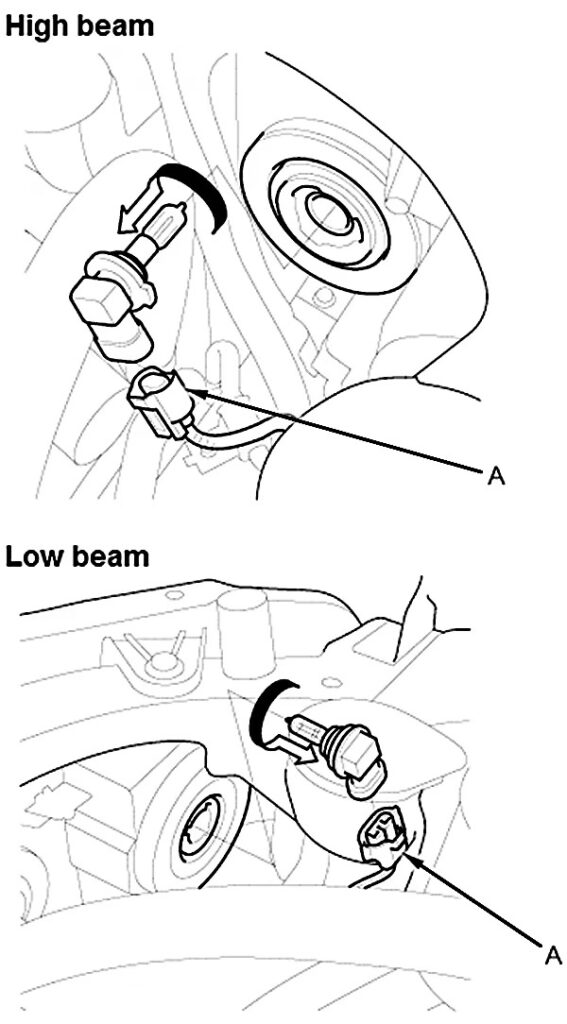
Do not touch glass area of bulb with your hands. Clean glass area with isopropyl alcohol, if required
- Disconnect electrical connector from headlight
- Turn bulb socket counterclockwise to remove it from headlamp housing
- Remove bulb
- Reverse procedure to install
High Mount 3rd Brake Light Bulb
- Push in hooks, and remove cover from high mount brake lamp
- Disconnect electrical connector from lamp
- Remove mounting bolts and housing
- Reverse procedure to install
License Plate Light Bulb
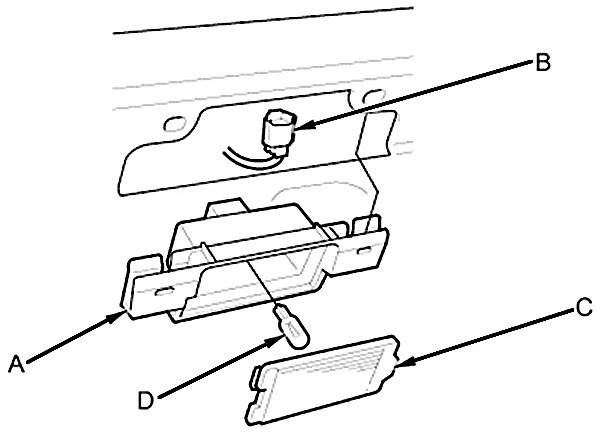
- Remove license plate lamp from tailgate lower cladding
- Disconnect electrical connector from lamp
- Carefully remove lens, then remove bulb
- Reverse procedure to install


Honda Element Technical Service Bulletins
Over the years Honda has released a number of TSB's to help Honda technicians repair common problems. We got our hands on them and they are all presented here to help you fix some of these common issues at home.
Honda Element Service Manual
The ultimate guide for servicing your Honda Element. This manual will show you everything you need to know about servicing your Honda Element, from oil changes to torque specs. It also provides helpful tips to maintain your Element.

Honda Element Diagnostic Code Meanings
Full list of all of the possible OBD2 code readings that can occur when that pesky check engine light illuminates. These can give you a start to help you diagnose your Element. Code Reader Link also provided if you want to own your own reader.

How To Change Oil in a Honda Element 2003-2011
Tools & Materials Needed Pro Tips Why This MattersRegular oil changes prevent engine wear. The Honda Element’s K24 engine is reliable but thrives on timely...
Read More
Complete Honda Element Tune Up Schedule Guide
Hey Element Enthusiasts! Your Honda Element isn’t just a car; it’s a trusty companion for adventures big and small. Whether you’re hauling gear, cruising the...
Read More
Honda Element Cabin Air Filter Replacement Guide (2003-2011)
🛠️ Supplies Needed 📖 Step-by-Step Replacement Step 1: Open the Glove Compartment Step 2: Remove Glovebox Stops Step 3: Access the Filter Housing Step 4:...
Read More
Honda Element Bulb Replacement Blowout Diagram Guide
Master Honda Element bulb replacements with our detailed blowout diagram guide! Perfect for DIYers, this visual resource covers headlight, tail light, and interior bulb locations...
Read More